Wednesday, November 28, 2012

Ten Terrific Card Games to Teach Math Facts


Most of us grew up learning math facts the good old “drill and kill” way, with flash cards. A handy alternative to flash cards is a standard deck of cards. They help students master their addition and multiplication facts while taking some of the “kill” out of “drill”.

What’s the advantage to using standard cards?

Randomization. I don’t know about you, but I breathed a sigh of relief when my least favorite “fact” was flashed at someone else to solve and then put on the bottom of the stack. I knew it was gone, at least for a while and I could put off learning 7 X 8 (for example) for a few more minutes. By using a standard deck of cards, the students (and you) never know what combination will happen next.

Flexibility. You can control what facts are learned by “stacking the deck”. Do your students need help with their 5’s, 6’s, 7’s, and 8’s multiplication facts? Fine. Create a deck with just those numbers. Do they  need 9’s facts reinforced? Super. Pull one card from the deck each time and have students multiply the selected number by 9.

Competition. Make it a game with rewards and consequences, winners and (dare I say it) losers.

Wanna try some? Excellent! Here are a few sample activities. For most of these, the face cards (king, queen, and jack) have been removed from a standard deck of cards.

Ten Activities and Games


  1. Draw two cards from the deck and have students either add or multiply the two numbers.
  2. Draw two cards from a deck. Make a two-digit number and create a factor tree for that number.
  3. Draw a card from the deck and have students list the first five multiples of that number.
  4. Deal ten cards to each of four players. Have them group the cards to create as many groups of ten as possible. Students earn one point for each group. Shuffle and deal again. The first player to earn a predetermined number of points wins the game.
  5. Remove the face cards and tens from a deck of cards. Deal four cards. Have students arrange the cards to make a two-digit plus two-digit addition problem with the largest possible sum. (Version 2: Make the smallest possible sum.)
  6. Use the same deck as above (no face cards or tens), deal four cards, and have students arrange the cards to make a two-digit minus two-digit subtraction problem with the largest possible difference.  (Version 2: Make the smallest possible difference.)
  7. Students draw one card from a deck. They subtract their card from 100. The next student draws a card. They subtract their card from the previous student’s answer. Example: Player 1 draws an 8, so 100 – 8 = 92.  Player 2 draws a 5, so 92 – 5 = 87. As players approach zero, if a player draws a card that cannot be subtracted without going below zero, they pass. The player that draws the card that makes exactly zero when subtracted, wins the game. Example: The current total is 6. A player draws an 8, so they pass. The next player draws a 4, so they subtract 6 -4 = 2. The next player draws a 2, so they win.
  8. Reverse the above activity. Have students draw cards from the deck and add them. Example: Player one draws a 5. Player two draws a six, so 5 + 6 = 11. Player three will then add their card to eleven. Play continues until a player succeeds in drawing a card that exactly adds up to 100 (similar pass/play strategy as above.)
  9. Deal five cards to each of four players. Players look at their cards and select the two cards that make the largest sum (or product). All players show their two cards at the same time. The player(s) with the largest sum (product) earns a point. Players draw two more cards to replace the ones played. Play continues until all cards have been drawn and played.
  10. Separate the cards into two decks. Deck one contains the jacks, kings, and queens. Deck two contains the aces through tens. Players draw one card from deck one. This card determines if they will add (jack), subtract (queen), or multiply (king). They then draw two cards from the other deck and perform the indicated operation. 
Tuesday, November 27, 2012

Tech Tip: Illustrating Operations with Excel


Excel is all about formulas and functions. Or is it?

By introducing only one or two spreadsheet skills at a time within a mathematics framework, even little guys and gals can be introduced to spreadsheets as early as first grade.

Spreadsheet Concepts


To begin, demonstrate the following spreadsheet skills.

Terms: cells, columns, rows
Skills: resizing columns, filling cells, applying a border to cells

Resizing columns:
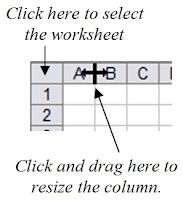
  1. Click the gray square above row 1 to select all the cells in the workbook.
  2. Place your cursor over the line between columns A and B.
  3. When it changes to a double-arrow, click and drag to resize the cells until they look like squares.


Filling cells:
  1. Click and drag to select one or more cells.
  2. Click the Fill Color bucket.
  3. Click a color to fill the cells you selected with that color.


Applying a border to cells:
  1. Click the Border button.
  2. Select the All Borders choice.


Math Applications


For the following activities, students prepare their spreadsheet by resizing the columns so that the cells look like squares. Then they fill squares with colors to illustrate a specific operation. Images of what the finished product might look like are below.

Illustrated Addition


Illustrated Subtraction

 Illustrated Multiplication

Illustrated Fractions

 Simple. Fun. Relevant. Visual.

And each activity can easily be finished during one computer lab session or station rotation within the classroom. 

Friday, November 23, 2012

Fun Friday: Spreadsheet Fill Puzzle


This puzzle uses the fill feature of any spreadsheet application. Simply start a new workbook and fill in the listed cells with the indicated color to create a picture.

Before you begin, adjust the cell widths so that each cell is a square. Click the blank space above the first row’s 1 and to the left of the first column’s A. This will select the entire spreadsheet. Then click on the divider between column A and column B and drag until the cells are squares.


To read the codes below and find out which cells to fill:
C2 à means find the square in column C and row 2, click on that cell, then click on the fill color.
C2:D2 à means click and drag to select cells C2 through D2 and then click on the fill color.

Hint: The first part of a cell code is always a letter. So if it looks like a zero, it is really the letter “O”. The same goes for the number one and the letter “I”.

Examples:
                O11 is the letter “O” and the number 11. (column O, row 11)
                I16 is the letter “I” and the number 16. (column I, row 16)

Now click in the indicated cells and fill with each color to form a picture.

Yellow: C2:D2, F2:H2, C3:J3, D4:K4, C5:L5, B6:M7, B8:N8, B9:P9, C10:T10, C11:O11, P12:M12, D13:K13, E14:J14, E15:I15, F16:H16, F17:G17, F18, E19:F19

Orange: D6:D10, E11:E12, F13:F14, G15, L13, K14:M14, J15:M15, K16:L16, T11:T13, S14, R15, Q16, P17, O18, N19, E20, L20:M20, F21:K21

Gray:  P11:S11, N12:S12, M13:S13, N14:R14, N15:Q15, I16:J16, M16:P16, H17:O17, G18:N18, G19:M19, F20:K20

Good luck and have fun!!

Thursday, November 22, 2012

Looking at Looks


Actors in movies communicate as much with a “look” as they do with their spoken words. Their eyes show a mischievous twinkle, a hint of fear, or a romantic gleam.  How can we convey those same “looks” on the page for our readers so they can “see” our character’s emotions?

The temptation is to simply write they “saw” something.
It looked like it might rain.
She watched the man cross the street.

These statements can inadvertently create distance between your character and the reader. You've told them what your character saw instead of letting them experience the moment through your character’s eyes. (The old “show don’t tell” mantra strikes again.) Try describing what your character saw without using the verb ‘saw’. (And no cheating. No synonyms either).

“It looked like rain.”
Could become: 
“The streetlights switched on in the afternoon’s gathering gloom and her hair poofed out in an annoying before-storm frizz.”

“She watched as the man crossed the street behind her.”
Could become: 
“The man crossed the street. She quickened her steps, but his pace matched hers.”

These do a better job of showing what’s happening and also have the added bonus of setting a mood.

Another “looking” pet peeve is giving the eyes unusual physical abilities.
  • His eyes ran over her.
  • Her eyes shot daggers.
  • Her eyes swept over the vista.


Eyes can’t actually run or shoot or sweep.  And using these could inadvertently create the wrong image in the mind of your reader. (Often a humorous one that completely destroys the mood.)

“Seeing” is one of our senses, and including the senses in our writing helps readers “see” where they are in the story.  So let your characters look at, watch, gaze, stare, glance, glare, and glimpse what is going on around them. But let the reader “see” through the reader’s eyes and experience the glorious vista of your character’s world for themselves.

Tuesday, November 20, 2012

Tech Tip: Story Starter Apps for Writing across the Curriculum


Story Starters – Ideas for Writing (an aptly named app) is published by Jarrod Robinson and costs only ninety-nine cents. This app features intriguing pictures to help kick start the creative writer within us all. Use it as a springboard for a short story, a mathematics word problem, or a discussion in any subject area.

For example the picture below could be used to:
  • Write a story explaining why the crate is there.
  • Write a math word problem to find the volume or surface area of the crate.
  • Imagine and write about the world surrounding the crate.
  • Come up with a list of practical uses for the crate.

Oflow, another ninety-nine cent app, lists over 100 methods to get your creativity flowing. View one a day whenever you need a bit of inspiration, or scan through several until the right one fires your writing neutrons into action.


And since the Oflow image mentions it, Idea Sketch, a free app from No Sleep Software, is a simple mind map making tool. Use it to:
  • Brainstorm
  • Free write on a topic
  • Flowchart a process (order of operations)
  • Categorize terms or objects (equations, quadrilaterals, fractions and their equivalents)


Have fun with these idea generators. Be inspired and imagine greater than ever before.

Sunday, November 18, 2012

Tips for Writing a Novel


The end of 2012 is fast approaching. In preparation for that all-important New Year’s Resolution, I’m reviewing my notes from workshops and presentations I’ve attended during the year.

In January 2012, my local SCBWI chapter (Society of Children’s Book Writers and Illustrators North/Center Northeast Texas chapter) was privileged to have Paula Laroucque speak to our group.

Among other things, she gave us some practical advice for writing a novel.
  1. Make a road map. Skipping the planning often results in getting lost or taking the long way around to finishing your novel. Start with the destination (major problem), add a handful of possible routes (very brief action sentences), and then create bios for characters that will accompany you on your journey.
  2. Get organize so you can spend writing time writing. Put the actual manuscript in one place. Organize scenes, cuts, and “in the wings” themes in another.
  3. Allow yourself to write a really terrible first draft. Lower your standards because it is a FIRST draft and chances are you’ll end up throwing a lot of it out anyway.
  4. Write in scenes, not necessarily in consecutive order.
  5. Don’t tell everything. Let the reader fill in the details. Hold out a little. It will build suspense and keep readers reading to find out what happens.
  6. Read! (Not necessarily in the genre you’re writing.)
  7. Join a critique group!!


Visit Paula’s blog at:

It’s loaded with great articles and advice for writers of all skill levels and genres. 

Friday, November 16, 2012

Fun Friday: Quadrant One Connect the Dots Puzzle


Use a sheet of graph paper to plot the following ordered pairs. Then connect the points in the order you graphed them to make a picture.

Techie Connection: You can also type the ordered pairs into a spreadsheet like Microsoft Excel. The x values would go in the A column. The y values would go in the B column. Then click and drag to select all the numbers and create a Scatter Chart with Smooth Lines (Insert ribbon/Scatter).

Enjoy!

(7, 12), (6, 11), (5, 9), (4, 10), (2, 10), (0, 8), (0, 4), (1, 2), (3, 0), (4, 0), (5, 1), (6, 0), (7, 0), (9, 1), (11, 3), (11, 8), (9, 10), (7, 10), (6, 9), (5, 9), (5, 11), (6, 13), (8, 14), (8, 12), (7, 10)

Thursday, November 15, 2012

Teaching Fractions with Dominos


Looking for a tactile manipulative for helping students visualize fractions? Dominoes and fractions are natural partners:
1.             They both have two numbers.
2.             The numbers on both are separated by a line.
3.             Since the numbers are represented by dots, it’s a great visual for introducing fraction concepts.
4.             And the dominoes can be turned either way without a number becoming upside down.

Writing Fractions – For the beginning fractionier, have students select a domino and then turn it so it represents a fraction less than one.

Simplifying Fractions – Students select a domino, and then turn it so it represents a fraction less than one. To help them determine if the domino fraction can be simplified, have them redraw the domino on paper. Then ask them experiment to see if they can circle dots to create the same number of groups both above and below the fraction line. If they can, then the fraction can be simplified.

Improper Fractions – Select a domino and turn it so it represents an improper fraction. Once again, they can redraw the domino on paper to help them. Circle groups of dots in the numerator equal to the number of dots in the denominator. Count the circled groups to make the whole number. Uncircled denominator dots become the numerator.

Equivalent Fractions Game – Turn all the dominoes upside down. Two or more students all draw dominoes from the pile at the same time. As they turn them over, they try to find a pair of dominoes that are equivalent fractions. The first student to find a pair, wins the game. Turn the dominoes face down and play again.

Add, Subtract, Multiply, or Divide Fractions – Students select a pair of dominoes from the pile. Depending on their skill level, have them add, subtract, multiply, or divide the fractions represented by the dominoes.

Since domino sets come in double-sixes and double-twelve’s, the difficulty level of each of the above activities can easily be modified.

Oh, and don’t forget. In the original dominoes game, players match domino ends. They score when the sum of the end values is a multiple of five. Okay, so that doesn't have a lot to do with fractions, but it is, after all, dominoes.

(Previously Posted on my Adventures in Mathopolis blog, October 2011)

Tuesday, November 13, 2012

Techie Tips: Teaching Probability


I've used colorful candies, number cubes (aka dice), spinners, random number generators and more to hammer the concept of probability into my students’ heads. Apparently not an easy idea to grasp for most people, otherwise Vegas would go broke. Technology can provide teachers with many of the manipulatives mentioned above and more to help students conquer this concept.

Apps

Undecided, published by Deadmans Productions LLC is a free app. It includes a dice roller, coin toss, spinner, drawing for the short straw, rock/paper/scissors, and a random number generator.

Dice, published by Benoit Layer is also a free app. It allows you to customize it to roll anywhere from one to twenty dice at a time. The total for the dice rolled is shown in the background. Settings include dice color, sound, and background.

Websites

Marbles Probability (Shodor)
This site simulates the random selection of from 1 to 3 marbles from a bag. The chart shows all possible combinations, the percentage that a theoretical likelihood of a combination will be drawn, and the experimental outcome as a percent of each combination.

Adjustable Spinner (Shodor)
The default spinner has four equal sections, but as the name implies, this can be adjusted. Just click and drag the slider next to each color, or type new percentages into the white boxes next to each.

Experimental Probability Spinner (Shodor)
As each color is spun, a tally is kept for each color. There are several pre-designed spinners or you can design your own spinner.

The Sum of Two Rolled Dice & Graphed Results (Saint Anne’s School)
This site will roll two six-sided dice and then graph the sum of the two dice. Click anywhere on the dice to begin, then press the space bar to roll the dice. The graph updates after each roll to reflect the sum of the two dice.

The Sum of Two Rolled Dice & Tallied Results (Shodor)
This site will roll two six-sided dice and tally the sum of the two dice in a chart. The dice rolls are displayed as a regular dice and as a net. You can also click the New Dice or Make Dice button to use a dice that repeats numbers.

Monday, November 12, 2012

Submitted, Accepted, and Published (Eventually)


I realized early in my writing career that nonfiction sells easier than fiction. Nonfiction is, after all, ninety percent of the market. So although I passionately love and continue to write fiction, I also write nonfiction and how to.

I researched a story, targeted the market, and had a nonfiction article accepted in 2007. The magazine clustered articles by theme, so I wasn't surprised when my story was slated to be published in December… 2010. Years passed. The date of publication came. And went. And my story wasn't published. Other projects pushed the missed publication date into the back of my mind.

Last month, I got a check in the mail. No letter accompanied it, but printed on the check in tiny bold letters was a date: October 2012. Hmmm….

So I waited. And while I waited, I cashed the check. (Of course). The second week of October 2012 I received a contributor’s copy of the magazine. Hooray! It only took five years, but my article was published. and I had received a whopping thirty dollars for my patience.

The moral of this story:
       Crime doesn't pay. Sometimes writing doesn't either.
              OR
       Hang in there, baby!

Sunday, November 11, 2012

Nervous Characters


I read the latest chapter in my young adult book to my critique group. One critiquer said there was too much “clenching”. (Not the romantic kind).My character, thrown into a stressful situation had reacted with clenched teeth, clenched fists (twice), and (in previous chapters) a whole body clench.

A character in danger is an interesting character. It encourages readers to turn the pages and find out what happens next.  But how does a writer “show” nervousness and pent up anger?

The “clenching” method does “show” nerves and works well in moderation. Here are some other ideas:
  • Biting lips, fingernails, or the inside of the cheek.
  • Inability to stand or sit still: drumming fingers, tapping or shifting of feet, crossing or uncrossing legs, pacing.
  • Pushed toward anger/ready to fight: knuckle cracking, fist flexing, standing up, crossing the arms.
  • Eyes: glancing toward a door or around the room (i.e. looking for an escape route), glaring (challenging), eyes fixed on something other than the speaker or thing making them nervous (denial, “If I ignore this thing, it will go away.”).

For other “showing” ideas, page through a book on body language. There is subtlety in every human movement. We instinctively recognize and interpret them to read another person’s mood. Our job as writers is to intellectually use these movements to telegraph what’s going on in our character’s minds.

In addition to “body business”, another way to show nervousness is to create a “nervous” simile or metaphor appropriate for the age level and situation. A couple of sayings you may recognize are:
  • “Nervous as a long-tailed cat in a room full of rockers.” 
  • “Jumpy as a cat on a hot tin roof.”

And a non-cat description: 
  • “Nervous as a live fish in a toilet bowl.”

Find a unique, non-cliché way to describe your character’s mood. It can lighten a tense mood with a little humor, as well as showing (there’s that word again) something about your character. Example one’s rocking chair analogy has the feel of an older person, while example three relates to the experience of a younger character (i.e. flushing a deceased carnival fish down the toilet).

What’s your favorite “nervous as” phrase?

Friday, November 9, 2012

Fun Friday: Puzzling Math

Let's make this a fun Friday. Here's a little brainteaser for budding mathematicians old and new.

Rules:
1.  Each letter represents the same digit.
2.  Once letters have been replaced with a digit, the "math" has to work.
3.  Once a digit has been used for a letter, that digit can't be used for any other letter.

Simple Sample:
     MY + HE = US

Possible Answer (there may be more than one right answer):
     M=1, Y=2, H=7, E=8, U=9, S=0
     12 + 78 = 90

Now you try this one:
   PIG + PIG = OINK

There may be more than one right answer for this one as well. Give it a try and let me know what you come up with.